I recently revisited my original gluten-free millet bread recipe with one clear goal: to create a softer roll while retaining the structure that made the first version so reliable. I’m happy to report that it worked.
The original Millet Dinner Rolls (Gluten-Free, Wheat-Free, and Family Approved!) is still available on Vintage Virtues and remains completely gluten-free and dairy-free. I’ve since reintroduced dairy and learned more about how different flours, starches, and binders behave, especially when working with ancient grain options like millet and sorghum.
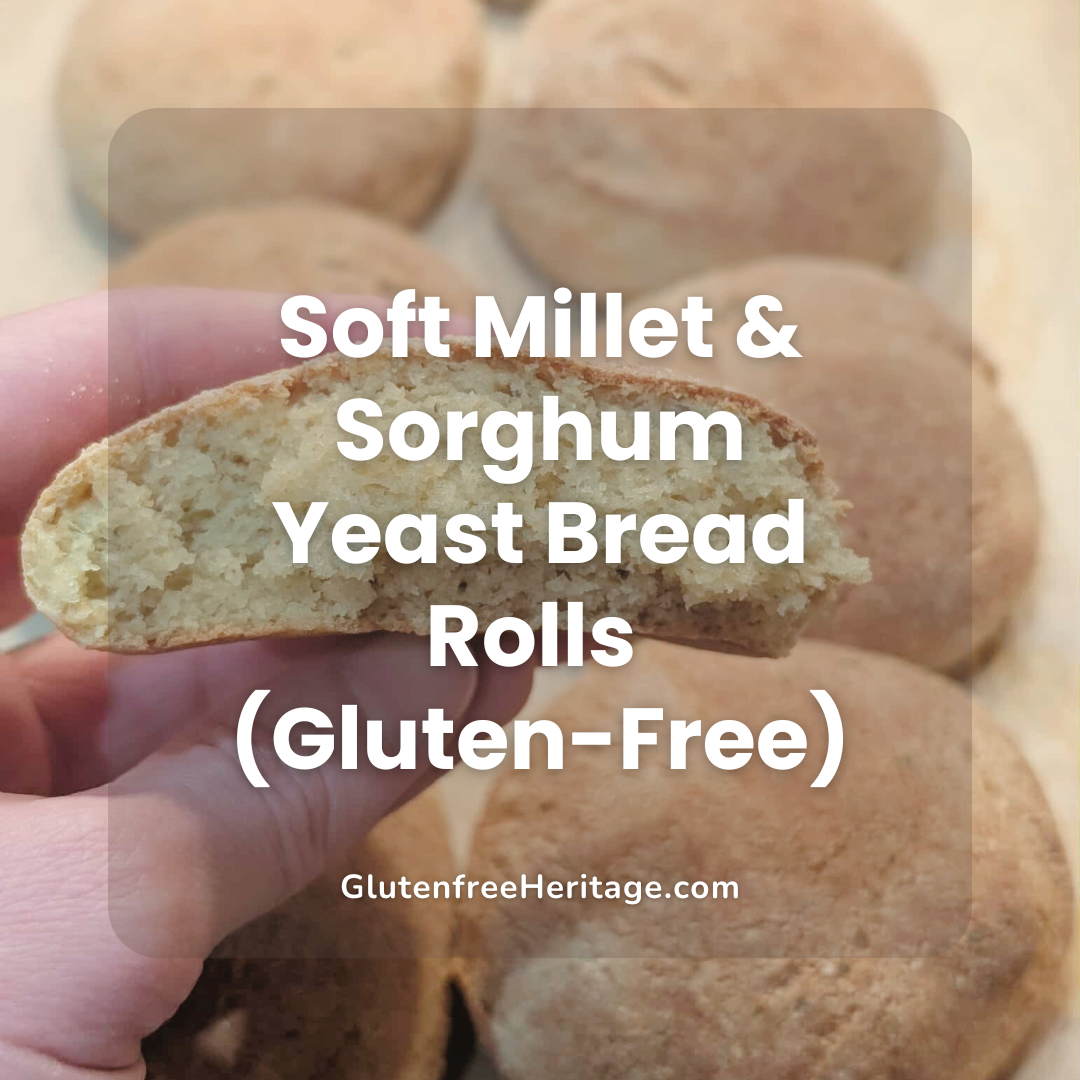
The final result is a soft dinner roll with a tender crumb, an ever-so-light nutty flavor, and a beautiful, soft rise that always feels like a small victory in gluten-free baking. These rolls are the perfect dinner accompaniment, soft enough to enjoy warm with butter yet sturdy enough for breakfast sandwiches.
Why This Version Works Better
One of the biggest changes I made was replacing brown rice flour with sorghum flour. Brown rice flour has its place in gluten-free baking, but it can easily lead to dry or crumbly results, especially the next day. Sorghum, on the other hand, produces a softer crumb and works beautifully with millet.
Millet remains one of the main flours in this recipe. I use a little more than a cup of millet flour made from whole millet, finely ground in my NutriMill Harvest grain mill. The flour is combined with tapioca starch, which I slightly increased for airiness, creating a balanced flour mix that holds moisture without becoming gummy.
This version is completely xanthan gum-free, relying instead on psyllium husk powder (or finely ground whole psyllium husks) to provide elasticity and structure. If you’ve struggled with gummy or dense free doughs in the past, this approach often yields the best results.
A Note on Yeast (Because It Matters)
This recipe uses active dry yeast, which means it must be activated before mixing. I bloom the yeast in a small bowl with warm milk (about room temperature to 110°F), along with a bit of honey, for about 5-10 minutes. If your yeast doesn’t foam, stop there; that means it’s not alive, and your bread won’t rise.
If you prefer instant yeast, you can adjust the method, but for the first time, I strongly recommend sticking with active dry yeast to ensure a reliable dough rise. I get my yeast in 1-lb bags from Azure Standard and store it in the freezer for maximum freshness.
Mixing the Dough
You can mix this dough by hand using a wooden spoon, or with a stand mixer fitted with a dough hook. I usually use the bowl of a stand mixer, starting on low speed and moving to medium speed just long enough to fully incorporate the dry ingredients and wet ingredients. I added in optional seasonings for a savory flavor!
The dough should be soft and slightly sticky, not pourable, but not stiff. Gluten-free dough behaves differently from wheat in all-purpose flour doughs, and adding extra flour too quickly can lead to dryness. Trust the process.
Once mixed, cover the large mixing bowl with plastic wrap or a kitchen towel and place it in a warm place to rise for about an hour.
How We Served Them
We first served these rolls warm with dinner, straight from the oven, and transferred them to a cooling rack until they set. They disappeared quickly. The best thing, though, happened the next morning.
The leftovers made incredible egg breakfast sandwiches, proof that these rolls aren’t just dinner bread. They hold up beautifully for millet sandwich bread–style uses and could easily be shaped into buns.
Gluten-Free Baking Without Compromise
If you’re living with celiac disease or simply choosing a gluten-free lifestyle, you know the frustration of store-bought bread that comes with an extra cost, crumbly, dry texture, and questionable ingredients. Learning to bake your own bread changes everything.
This recipe doesn’t rely on a commercial gluten-free flour blend; instead, it uses gluten-free flours to balance and create something closer to traditional yeast bread.
Make-Ahead & Freezer Friendly
These rolls freeze beautifully. Once baked and fully cooled, store them in an airtight container or freezer-safe bag. Reheat gently in the oven for the best texture.
They remain soft the next day, which makes them ideal for meal prep or doubling the batch. You can even freeze extras ready to bake for later.
Final Thoughts
This recipe has earned its place among our favorite gluten-free breads. It’s dependable, versatile, and deeply satisfying, everything you want bread to be.
Whether you’re new to gluten-free baking or returning to yeast bread after a long break, this is a recipe worth bookmarking. You can also join us at Fresh Milled Flour | Gluten Free Grains on Facebook for recipes, support, and all things gluten-free!
You’ll find the full recipe in the recipe card below, complete with measurements, guidance, and tips for achieving a gluten-like structure without using gums.
And yes, seeds like sesame, poppy, or sunflower make a beautiful topping next time you bake!

Soft Millet & Sorghum Yeast Bread Rolls (Gluten-Free)
Equipment
- 1 Grain Mill Get $20 Off with code VINTAGEVIRTUES at: https://nutrimill.com/VINTAGEVIRTUES
Ingredients
Dry
- 1¼ cups millet flour (– 160 g)
- ½ cup sorghum flour (– 60 g)
- ¾ cup tapioca starch (– 90 g)
- 1 tbsp psyllium husk powder (– 10 g)
- 2 tsp baking powder (– 8 g)
- ¾-1 tsp ea salt (– 5–6 g)
Optional savory:
- ½ tsp garlic powder (– 1 g)
- ½ tsp onion powder (– 1 g)
- 1-2 tsp dried herbs rosemary, thyme, or sage (1–2 g)
Wet
- 1 cup warm milk 110°F / 43°C – 240 g
- 1 large egg room temperature (– 50 g)
- 3 tbsp melted butter (– 42 g)
- 1 tbsp honey (– 21 g)
- 1 tsp apple cider vinegar (– 5 g)
- 2 tsp active dry yeast (– 6 g)
Instructions
- Activate the yeast: In a small bowl, combine warm milk (110°F / 43°C), honey, and active dry yeast. Stir gently and let sit 5–10 minutes until foamy and bubbly.
- Mix dry ingredients in a large bowl (millet, sorghum, tapioca, psyllium, baking powder, salt, optional herbs/spices).
- Combine wet ingredients (milk + yeast mixture, egg, melted butter, vinegar) into the dry ingredients.
- Dough should be soft, slightly sticky, thick mashed-potato consistency.
- Let rest 5–7 minutes for psyllium to fully hydrate.
- Shape rolls: lightly oil hands and form 8 rolls. Place on a greased or parchment-lined baking sheet.
- Rise: cover loosely and let rise in a warm spot 45–60 minutes, until puffy (not necessarily doubled).
- Preheat oven to 375°F (190°C).
- Bake: 18–22 minutes, until tops are lightly golden and internal temp ~200°F (93°C).
- Finish: brush tops with melted butter immediately after baking for extra flavor and softness.
- Cool slightly (10 minutes) and serve warm.
Affiliate Disclosure
This blog post contains affiliate links. Purchases made through these links help support Gluten-Free Heritage at no additional cost to you. Thank you for supporting this work! To Save $20 off your next Mill or Mixer, use code VINTAGEVIRTUES at NutriMill.
Leave a Reply