Our homeschool co-op teens got a lesson on how to make pasta, and now that lesson + GF recipe is being made available to you. This gluten-free pasta recipe is made with freshly milled flour. However, it’s also easy to customize into a fresh-milled wheat-based or store-bought flour-based recipe. I’ll also offer some preparation tips to help with the process, including photos and a video showing the entire process in about 1.5 minutes.
To accommodate gluten allergies at our co-op, we split up into groups. I headed up the Gluten-free group, and another teacher headed up the rest of the class. Pasta is actually easy to make. I first learned how to make pasta from The Loopy Whisk’s gluten-free pasta recipe, gotta give credit where credit is due. Once I learned how easy and tasty homemade pasta is, that was it, no more intimidation. The only differences between gf pasta and traditional pasta were the amounts and types of flour used.
Ingredients, Substitutions, and Equipment


Ingredients
So let’s talk about the ingredients. Pasta is really made with three main ingredients: flour, egg, and oil. The original recipe I used also included xanthan gum, which I no longer use, so I’ve since adapted my own recipe.
I start with my custom blend of gluten-free cup-4-cup flour, made with brown and white rice flour, sorghum, arrowroot starch, and tapioca starch, and it includes a xanthan-free option that uses psyllium husk powder instead. If you’re not opposed to xanthan gum, you can add 1 tsp to the 200 grams of GF Flour used in this recipe; this will improve the dough’s elasticity, but it’s not required. I highly recommend you keep a jar or two of this on hand for convenience. Simply seal the flour in an airtight container and store it in the freezer to preserve its fresh-milled flavor. For those who aren’t gluten-free, the rest of the class used regular flour and increased the amount to 2 cups, for a total of about 240-250 grams of flour.
The rest of the ingredients remained the same. The second ingredient is three eggs, and finally, a little oil to smooth out the dough. That’s it. three simple ingredients!
Equipment
If you’re milling your own flour from grains, you’ll need a mill. I’ve made fresh-milled flour with the KitchenAid metal mill attachment, the NutriMill Classic, and the NutriMill Harvest. My everyday preference is the NutriMill Harvest, but for the flour in this recipe, I used the NutriMill Classic, known for its large-capacity 20-cup canister and fast-milling burrs.
This recipe doesn’t require a mixer, but you can certainly use one to speed up the dough’s smoothing. I recently upgraded to the Bosch Universal Plus, and let me tell you, it’s awesome for double- and triple-batching. You can get $20 off one with the code VINTAGEVIRTUES. Alternatively, you can mix in a large mixing bowl and knead by hand.


Save $20 off with code VINTAGEVIRTUES

Finally, you’ll need to decide on how you want to process your pasta dough. You can do it by hand or use a pasta maker. One of the teachers used a hand-crank pasta roller similar to this. The benefits are that it’s affordable and doesn’t require power to operate. I used the Kitchen Aid pasta roller attachment, which includes a pasta roller and cutter set, to achieve an authentic pasta look. The benefit is that it doesn’t require manual cranking; the roller spins automatically when powered on, freeing your hands to work with the pasta. Either way, both devices get the job done!
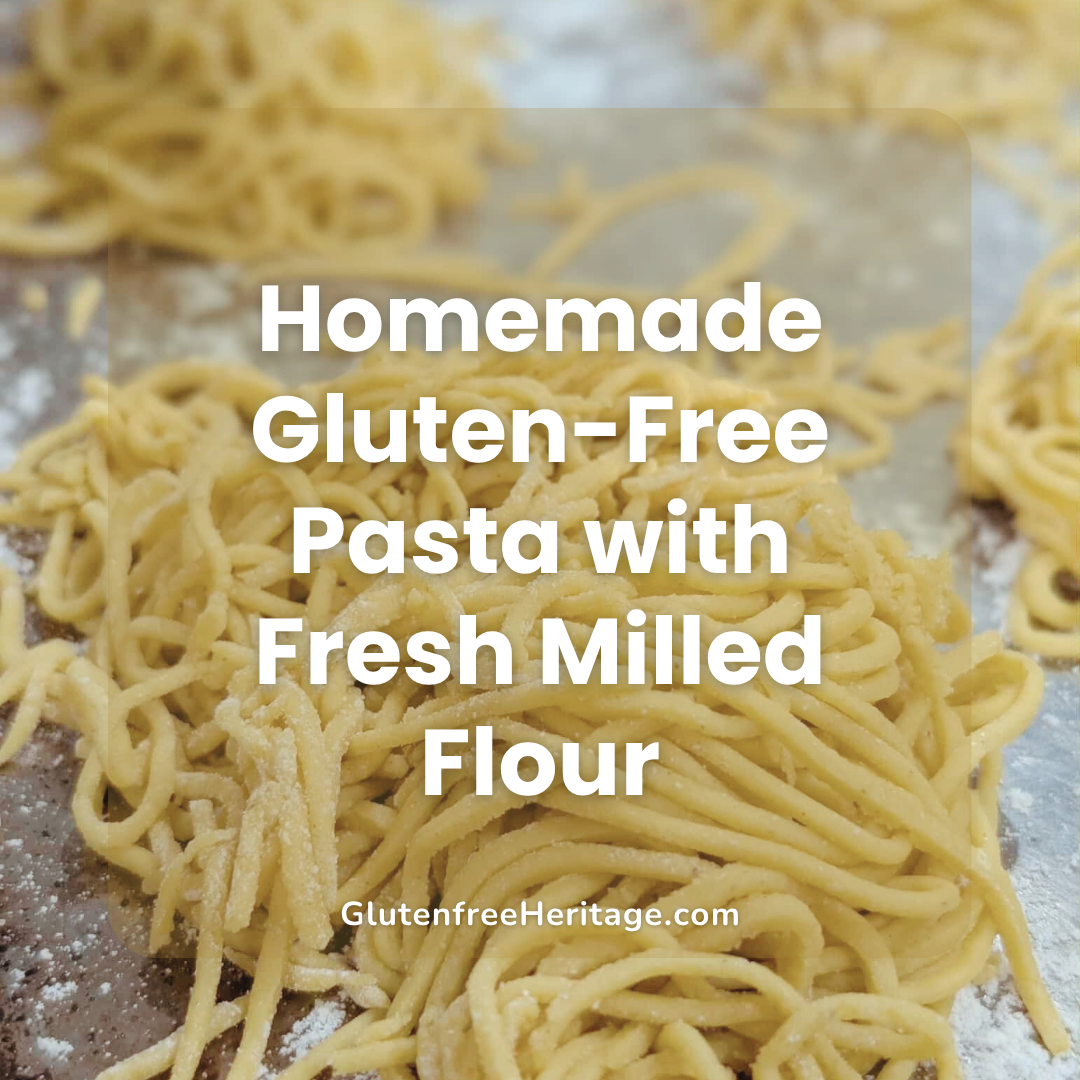
If you want to get really fancy, you can even hang your pasta to dry on a rack like this. But I usually make bird’s-nest piles of fresh pasta, dusted with flour to keep them from sticking together, then quickly move on to cooking them.
Preparation, Tips, & Storage Notes
Measuring Flour
Once you have all the ingredients and equipment you need, the fun part of making pasta begins. First, you’ll need to measure out your flour. As one of our teachers taught, the easiest way to measure for pasta-making is to scoop flour into the measuring cup and level it off. Don’t pack it in! This is the method the whole class used. But, my preferred way, with fresh-milled flour, is to weigh in grams. My favorite scale is the large, NutriMill glass scale. For this gluten-free recipe, 200 grams of the all-purpose GF flour is the perfect amount.
Incorporating Liquids
Once the flour is measured into a large mixing bowl, create a well in the center to hold the liquids. To that well, add 3 eggs and 1/2 tablespoon of olive oil. Mix the eggs and oil thoroughly before incorporating the flour; you can do this with your fingers or a mixing utensil, such as a wooden spoon. If you try to pull in flour without mixing the liquids, some of the moisture won’t penetrate the dough, so mix the wet ingredients first, then add the flour. Incorporate the flour from the inside out, pulling in more and more as you mix until it is fully incorporated.
Kneading Dough & Texture
To knead the dough in the bowl, push it into the dry flour until it’s all absorbed. The texture of the flour should be smooth, pliable, and play-dough-like. You can remove the dough from the bowl and knead it some more on a smooth surface. When working with gluten-free flour, the goal is to form a smooth, workable dough. If using wheat-based flour, kneading helps develop gluten, which gives the dough its elasticity. The optional addition of 1 teaspoon of xanthan gum provides elasticity to this GF recipe, but it is not required; we didn’t use it in ours. Once the dough ball is ready, cover and let it autolyze (absorb all of the liquids) for 20-30 minutes.


Pasta Time
After it has rested, cut the gf dough into 4 equal balls. You’ll work with one piece at a time, keeping the remaining dough portions covered with plastic wrap or a damp towel to prevent them from drying out. Be sure to work the dough on a lightly floured surface to prevent it from sticking. If you’re hand-rolling and cutting, use a rolling pin to roll the dough to the desired thickness. Once the thickness is reached, you can use the large flat sheets as lasagna, or use a sharp knife or pizza cutter to cut into strips of the desired thickness. This will result in dumpling-style or flat fettuccini-style pasta. Alternatively, you can also roll into the desired pasta shape.
If using either the hand-crank, manual pasta roller, or the Kitchen-Aid attachment, you’ll first use the sheet roller. Start at the level 1 widest setting to roll the dough through. Fold the dough, and run through again. Ideally, you should run on the widest setting twice to make the sheets thin enough to process through the next setting, then turn the dial up to level 2 and run the sheets through again. You can continue doing this until you reach the desired thickness for the pasta sheets. Given the gluten-free pasta dough’s fragility, we found that levels 2-3 were the maximum for producing adequate pasta sheets. Whereas those using regular pasta dough reached higher levels of 3-4. These dough sheets can be used at this step for lasagna. However, if you’re making pasta like fettuccine or spaghetti, it’s time to use the appropriate pasta cutter.
Once the pasta sheets are ready, very lightly dust them with flour, then change out the sheet-roller attachment to the spaghetti or fettuccini attachment to roll out strands of fresh noodles. Lightly flour the stands to prevent them from sticking together and clumping.


Bring a large pot of salted water to a boil, with about a tablespoon of olive oil to prevent sticking. Once the water is at a rolling boil, add the pasta and cook for about 5 minutes; the pasta will begin to float when it’s done and should have an al dente texture. Strain the water off and serve the warm pasta with your favorite sauce. We offered an Alfredo sauce and a red sauce. If you’re not ready to boil, you can also refrigerate it for a day or freeze it until you’re ready to use it.
Recipe

Homemade Gluten-Free Pasta with Fresh Milled Flour
Ingredients
- 200 g 1⅔ cups plain gluten-free flour blend, plus extra for kneading and dusting the pasta
- *1/4 teaspoon xanthan gum optional, to aid in elasticity but not required
- 3 large eggs
- ½ tbsp olive oil
Instructions
- If milling flour, try Fresh Milled Gluten-Free Cup4Cup Flour Blend Recipe
- Weigh 200 grams gluten-free all-purpose flour into a large mixing bowl.
- Make a well in the center of the flour.
- Add 3 eggs and 1/2 Tbsp olive oil to the well.
- Mix the eggs and oil together first (with fingers, fork, or spoon), then start pulling flour in from the sides.
- Keep mixing until a dough forms and all flour is incorporated.
- Knead in the bowl (and/or on a smooth surface) until the dough is smooth, pliable, and Play-Doh-like.
- Cover and rest the dough 20–30 minutes.
- Divide dough into 4 equal pieces; keep unused pieces covered.
- On a lightly floured surface, roll dough by hand with a rolling pin or run through a pasta roller starting at level 1, fold, and run again at level 1.
- Continue rolling to desired thickness (GF dough is usually best around levels 2–3 on a pasta roller).
- Use sheets for lasagna, or lightly dust sheets with flour and cut into noodles (knife/pizza cutter or pasta cutter attachment). Dust strands lightly to prevent sticking.
- Bring a large pot of salted water to a rolling boil (optional: add 1 Tbsp olive oil).
- Boil pasta about 5 minutes, until it floats and is al dente.
- Drain and serve with your favorite sauce.
Notes
Mix wet first: Fully whisk the eggs and oil in the well before pulling in flour so the dough hydrates evenly.
Rest matters: The 20–30 minute rest lets the flour absorb moisture and makes the dough smoother and easier to roll.
Fight sticking early: Keep the surface, roller, and sheets lightly dusted with GF flour (rice flour works especially well). Dust cut noodles and separate into loose nests so they don’t glue themselves together.
Roll gently: Gluten-free sheets are more fragile—on a pasta roller, levels 2–3 are usually the sweet spot.
Cook to al dente: Start checking around 5 minutes; overcooking makes gluten-free pasta soft and prone to breaking.
Video
Affiliate Disclosure
This post includes affiliate links. If you choose to purchase through them, I may earn a small commission at no extra cost to you. This helps offset the extra cost of recipe testing and allows me to continue sharing free recipes made with whole foods.
Leave a Reply